A little veneer work

M

MrBoat

Audioholic Ninja
5/8" isn't a bad thickness for these but I still like 3/4. Thicker with bracing should dampen these noticeably. I was able to salvage the ports once I cut the baffles from the speakers and they are nice, IMO, and the crossover looks to have decent quality parts as well. I was able to save the baffles. I started to toss them but they are of a good quality MDF.

I can reuse the front baffles if I pad them with a piece of 1/4" ply that I have. The cabinets will be expanded slightly to account for the mass of the bracing and even with expanding the baffles, it will be easier than laying out and doing all of this otherwise, non-typical router work, that makes special accommodations for the waveguide that couples the mid and tweeter.

Being that I can pad the inside of the baffles with a layer of 1/4", this will leave a land for any side or end extensions I glue to the edges. I can trim a bit of all 4 sides on the table saw so that I am not just gluing slivers on. It's overkill from a construction standpoint, but makes keeping things flush (or proud enough to sand some off, ideally) easier. I could just make them slightly deeper and not mess with the overall dimension much. It's not going to take much added volume to make up for a single, central brace, so that'd likely be the best option here. Only difference is from the thicker panels and in this case would just be .125 on all sides.

I would likely settle for solid wood picture frame around the baffle and veneer over that so that any further edge treatments (bevel or round-over) could be integrated without much contrast or at least within stain blending range.


Baffles are MDF while the casework is particle board. Here is the "budget" part of this build.


Last edited:
M

MrBoat

Audioholic Ninja


Perhaps this weekend I can get a good start on these. Just add some rabbets and assemble. Still need to modify the baffles to fit the now larger OD.
 
M

MrBoat

Audioholic Ninja
Progress. Corners are half depth rabbets. Baffles rabbets are 5/16" deep taken from the original baffles and am reusing the baffles so made those the same. I have to rebuild and fit the baffles first before figuring out where the braces can fit. Much of the baffle is otherwise used up so it's going to be tight.

 
Last edited:
isolar8001

isolar8001

Audioholic General
I'm not as sharp as I used to be, but I find all of this very baffling. :)
(and excuse me, beautiful work by the way!! )
 
Last edited:
M

MrBoat

Audioholic Ninja
I was able to cut the old rabbets off of the baffles and add some stabilized (cactus juice/vacuum) cherry blanks to the edges with epoxy thickened with fumed silica and also filled screw holes and sealed the cabinets. I flow epoxy on the ends that have the rabbet engrains and then sand flat. This helps keep these joints from telegraphing through the veneer years on down the road. I typically use multiple coats of lacquer and let it cure for months and then block sand the whole affair so any minor telegraphing that may occur due to shrinkage later on, is leveled out in the final sanding.

There only needs to be enough cherry for round-over or chamfered edges so there won't be any issue with the hardwood moving differently than the MDF. These epoxy joints are just clamped tight enough for a bond but enough epoxy is left in the joint which is what the thickener helps maintain. Epoxy relies on film strength and you don't want to clamp it as tight as wood glue. Since it is vacuum/resin stabilized, glued with epoxy and then sealed very well after, I expect no issues from it. Cherry is pretty stable on it's own once dry anyway. The resin used to stabilize it is then heat cured in an oven afterwards, and any movement will surely show then. It's the same resin I use to stabilize my wood knife handles.


It's a lot of extra work but I live in Florida and these methods have proven pretty reliable with my wood boat building projects so it's pretty much overkill here and is what I have the most supplies for.
 
M

MrBoat

Audioholic Ninja
Looking good man!
Everything is well oversize on the baffles and most of that bulk gets machined off.

lol. . . See what you started, William?

Meanwhile, I am listening to your ex's while waiting for epoxy to dry on these. I only had enough clamps to do one baffle at a time and I swore to not rush these like everything else I get into. Having the second set to listen to during, helps.
 
William Lemmerhirt

William Lemmerhirt

Audioholic Overlord
Everything is well oversize on the baffles and most of that bulk gets machined off.

lol. . . See what you started, William?

Meanwhile, I am listening to your ex's while waiting for epoxy to dry on these. I only had enough clamps to do one baffle at a time and I swore to not rush these like everything else I get into. Having the second set to listen to during, helps.
Ok. I’ll except that it’s my fault! Can’t wait to see em.
 
M

MrBoat

Audioholic Ninja
Slow progress during the work week. I did manage to get one box sanded and trued and the back panels fit. I wait until the boxes are assembled and cut the back panels more precisely to size because I use those to square the cases before fitting the baffles. Cases were true within a 16th but the back panels fine tune them more perfectly after the fact.

I use the RO to take the tacky gloss from the epoxy and use the misery whip to flatten/read the flat areas and to really crisp up the corners which makes for a better overall veneer job. The idea behind the epoxy barrier coat is to seal the end grains and basically homogenize everything so that the contact cement doesn't cure differently in the more absorptive end grain. The end grain will cause the contact adhesive to shrink more than the flat areas, otherwise, causing those areas to show thru the veneer, months down the road.

Also, unsealed MDF and plywood takes two coats of contact cement or there will be starved areas when applying it by hand. It's overkill to be sure but I hate applying contact cement to an otherwise wooden sponge.


The RO sander alone, causes dish-outs on the flat panels when trying to concentrate on just the putty spots. Not really a big deal but I notice it when blocking the final finish coats. This step just makes everything ultra flat. A bit looney, probably, but just the way I was taught.
 
Last edited:
M

MrBoat

Audioholic Ninja
I got the baffles fit. Can't trim the edges until the veneer is on the cases. I started to go for it and decided against it with trying to take my time instead of getting into that habitual production rush job I always get into like it's my real job, or something. I can tinker with the braces during the week and do the veneer next weekend.

Machining the cherry edges flush with the baffle faces was a tedious affair. All the grain was going the wrong way with regard to the direction I had to flush trim it. I am somewhat surprised at myself for not catching that ahead of time when I installed it. All but one edge was arranged the wrong way, which made me really have to be careful of tear out. Basically had to nibble away at it, which took awhile.

 
M

MrBoat

Audioholic Ninja
I'm making progress. Some design changes have caused me to need more steps in between. Example being, The originals have a small chamfer on 3 baffle edges. After I got the cabinets routed for the same reveal the stockers have, I didn't like it, so I padded it out some, roughly .125" thicker. This way I can try a decent round-over first, and if it doesn't look like I want, I can change to a bevel like the originals. Anyhow, this caused me a whole other step that set me back a week. I just keep reminding myself I am in no rush.

Today, I started applying veneer to the backs and then quit after that. Wanted just to take it easy and relax the rest of the weekend away with some music listening.

Got the braces done as well. Huge difference with the tone of the rap test after adding the brace. These speakers could likely get away without braces, especially with 18mm MDF, but wth.


I used a spreader clamp to push the box sides apart when I put the brace in so all of the glue doesn't get rubbed off. From there it's just a matter of releasing the clamp and letting glue squeeze out normally. I meant to put rabbets for the braces and forgot. That and I could not be sure exactly where to put them until the baffle fitment/port tube clearance/location was set in stone.
 
Last edited:
M

MrBoat

Audioholic Ninja
Have been making progress. Got the cabinets veneered, and sunk some magnets into the baffles for grilles. The originals use the grommet/post. I thought about replacing those and just using the original grilles, which would certainly have been easier, but figured I may as well take advantage of the no hardware look, now that I have veneer.

Got some good grain matches on all but one side. The bearing on my flush trim bit roached and ruined one of the short ends, so I had to flatten it and add another layer that is out of grain sequence. It still matches somewhat. 7 out of 8 sides isn't a disaster. I should have bought a new bit for this job. Forgot I had used the other one patterning aluminum. Duh, me.


Once the magnets are sanded flush and prepped, I can veneer the baffles which is the last veneer step.
 
M

MrBoat

Audioholic Ninja
I did get the baffles magnetized and skinned. All that's left to do is rediscover the recesses for the drivers under the veneer, install them, flush trim them to the cabinets and then it's on to the finishing, which takes the longest. Being that these are monitors that can be laid on side or ends, I will use poly (glorified varnish) and burnish it to a satin finish.

IMG_9533
 
M

MrBoat

Audioholic Ninja
Nice progress boat!
I'm at that point where all the little tedious side details have come together that I need to address before gluing the baffles on, such as, revealing the original driver recesses and reinstalling the inner chambers for the mids. Each one of these tasks takes a day somehow, either waiting for glue to dry, or just the time it takes to do it.

Will feel much better when I can fit the baffles and flush trim the hardwood edges and then do the round-overs. Otherwise, I am having to look at the rough edges when everything else looks so sweet just adds to the impatience.

These cabinets are hefty. They no longer feel like budget speakers and the knuckle rap on the sides definitely signifies a much more inert enclosure.
 
M

MrBoat

Audioholic Ninja
We're out of the woods with the dreaded part of finding the original recesses for the drivers and trim. Before I had applied the veneer, I drilled the driver fastener holes thru from front to back. After I applied the veneer, I simply flipped the baffles and drilled the holes back thru to the front. This gave me a limit of material to clear away without studying so hard all the way around. I used a zip bit on the dremel to expose most of the screw holes, and then switched to the little dremel drum sander bit to reach close to the original edge of the recess. I left this a little proud, to get even a neater fit for the drivers.

Then it was simply a matter of installing the drivers centered evenly with all of those reveals around the fastener holes I had made. Then I just used a new blade on a utility knife and carefully scribed around from hole-to-hole intil it was mostly thru.
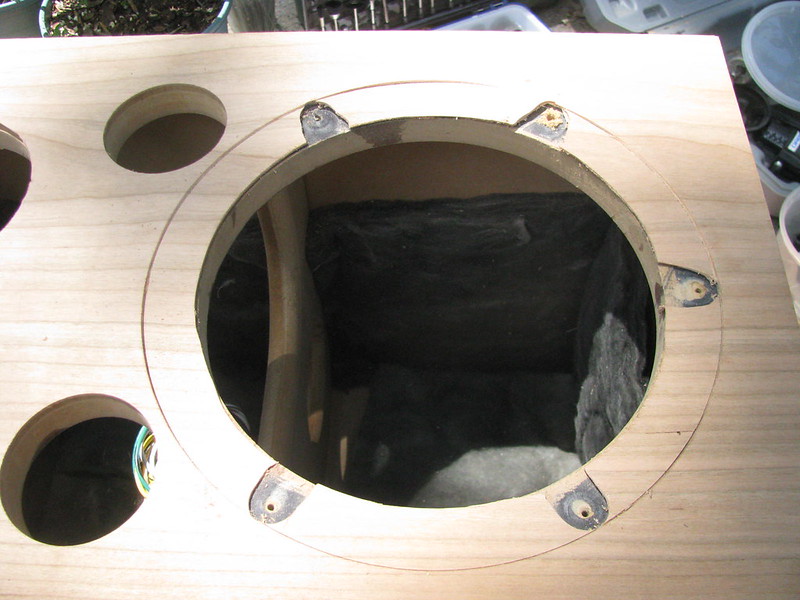
IMG_9535

Can maybe see how I centered the driver evenly, having multiple points of reference around the circumference of the recess to adjust evenly to. From here I used a utility knife with a new blade fr each recess. I angled the cut inward. I had to sand it to fit using a round puck of MDF wrapped with 180 grit sticky paper. I still have room to tune it even further but right now, I feel I have earned a Guinness.
IMG_9545

Same with the cavity for the mid, tweeter and faceplate. It fits so nice. There is a foam gasket that fits in here. It just snaps right into place.
IMG_9542

Drivers fit pretty much perfectly and certainly closer that factory. I consider this to be some of the upgrade. The finish will make it too tight, but I like sanding to fit there, because then I can more precisely chamfer any edges at the clear coat stage, and whatever residual imperfections there may be.
IMG_9539

I do like the look of the silver up against the cherry, and I will like it as it darkens from the finish and with age.
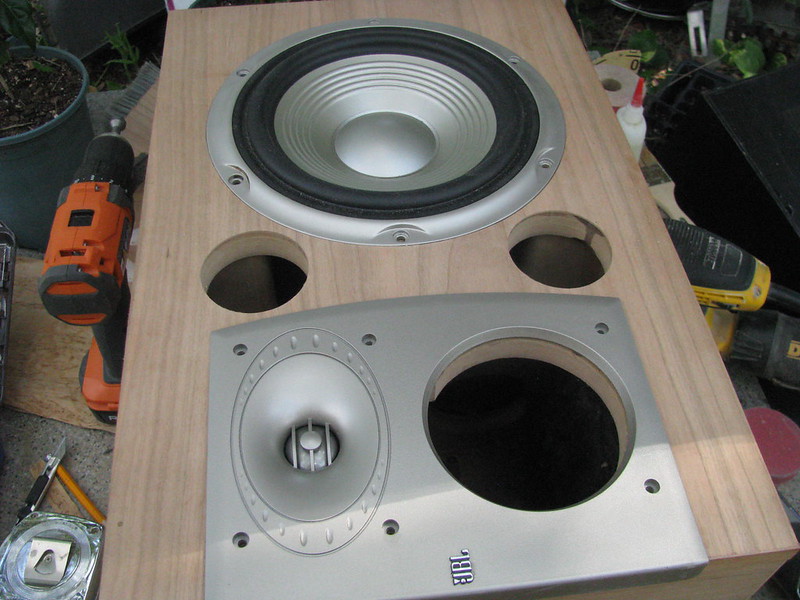
IMG_9548

I added CA glue to all the fastener holes. This will really tighten up the fasteners. There was one hole that was a bit strippy. . .so I added some sawdust and CA glue to it. These cabinets are turning out nice. Only way I could have improved from here was to use figured veneer, but I think this matches the hatch pretty well.

I am ultimately pleased with how this turned out. One slip here could have ruined the whole job, or at least sent me on a chase with putty and other hat tricks to fix errors.

ETA: Couldn't help it. Had to.
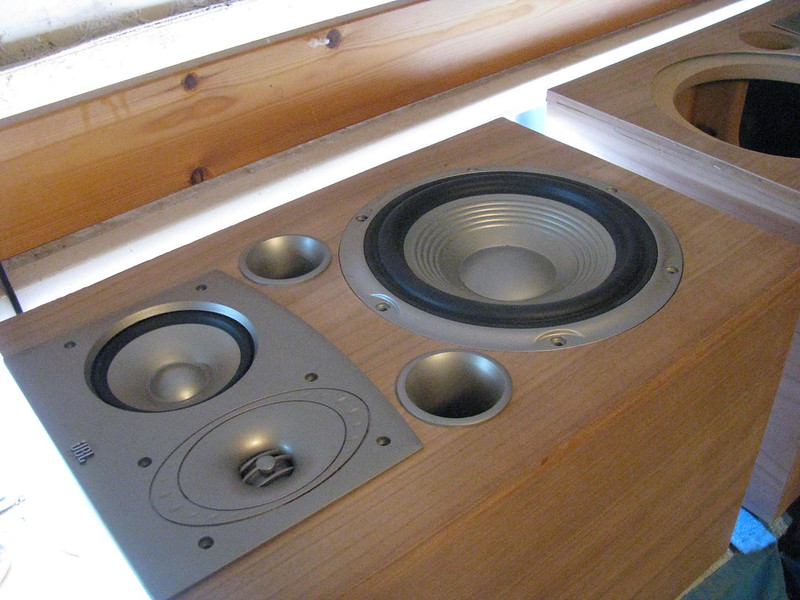
IMG_9551
 
Last edited:
M

MrBoat

Audioholic Ninja
On the way to upgrading, The plastic on these mid range cans is a bit thin. About the thickness of thin wall PVC. I had sound deadening material leftover from my truck. It's 80 mill bitumen of sorts it sicks really well, but can be removed and it's clad with thin aluminum. It definitely changes the sound of the can itself. I hot melt glued the cans, which sticks to MDF quite well. I added cleats with wood glue as some added redundancy. The original installation had staples. Mine weren't quite long/strong enough. I would have needed the air stapler at work. Didn't feel like dragging it out another day just for that. Don't know if this will make any difference but it shouldn't hurt, at least.

The wide reliefs on the baffles are from the factory as well. Their rabbets weren't quite deep enough so the relieved the baffles some. This will all be filled with epoxy when I glue them on. I will run a fillet on the inside of the epoxy squeeze-out. I would have glued them today but didn't have any nitrile gloves so will wait until I can get more of those before messing with epoxy in this situation. Also need some regular masking tape instead of that frog crap to keep epoxy from seeping under it to my veneered bits.


Last edited:
M

MrBoat

Audioholic Ninja
Got one baffle on. I rebuilt the woofer land since it wasn't the highest quality MDF. I ended up removing about an 1/8" of it and then built a dam around the opening with veneer, leveled the baffle both ways and then filled with epoxy to get the right depth for more substantial gasket material. Anyway, I got a nice fit and added a 1/4" round-over. I may go to 3/8" but I will look at it like this for awhile first. I have some artwork and blending to do with a little stain, since this veneer was wood backed, which makes it a plywood edge of sort.

 
Mark E. Long

Mark E. Long

Audioholic General
Got one baffle on. I rebuilt the woofer land since it wasn't the highest quality MDF. I ended up removing about an 1/8" of it and then built a dam around the opening with veneer, leveled the baffle both ways and then filled with epoxy to get the right depth for more substantial gasket material. Anyway, I got a nice fit and added a 1/4" round-over. I may go to 3/8" but I will look at it like this for awhile first. I have some artwork and blending to do with a little stain, since this veneer was wood backed, which makes it a plywood edge of sort.

Exelent work and will be gorgeous when done !
 

Latest posts

newsletter

  • RBHsound.com
  • BlueJeansCable.com
  • SVS Sound Subwoofers
  • Experience the Martin Logan Montis
Top