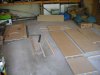
I didn't take nearly as many pictures as I should have of the build process (was to go go go to spend the time taking pics), but there's a few here, and it's still not complete so more will come eventually.
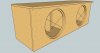
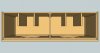
First two are the renders out of Sketchup (will supply the project file if anyone wants it). I had all the wood cut for me, since I don't have an appropriate table to cut it with (nor the patience to do a good job with clamps and guides). I wound up having them cut the driver knockouts too, since they seemed like a competent shop, even though I did have my router and the jig to do it set up already.
All 3/4" (19mm) full weight MDF stock, glued and air nailed. External dimensions are 66" wide, 21 1/2" deep, 22" tall.
As you can see, it's single layer bottom, back, and sides. Two layers on the front, and two layers on the top. The sides and front are braced with battens that were glued and nailed into place from both planes they met. The rear is braced with panels that run the full height of the enclosure, and 1/2 the depth, spaced evenly. More extensive bracing surely wouldn't hurt, but I decided that this was a reasonable amount that didn't eat up too much volume, and still provided (what I consider) adequate bracing to prevent resonance/flexing. I opted to place each driver in a separate enclosure for a few reasons: it prevents a failure of one connection, amplifier channel, or driver, from destroying the other driver; it reduces the length of the chamber, keeping any possible resonances to a minimum; lastly it provides a good brace in what is a long enclosure. The top extends out past the enclosure with the intent of building a removable grill down the length.
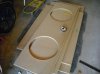
I began by pain stakingly marking out all the edges where boards meet, and on the reverse of each board, lines centered on all the nail areas. Doing this ahead of time was definitely the right thing to do, I had almost no fit issues, and only one nail that strayed (and I used a lot believe me). I built the internal structures on the back wall first (the four braces and the centre board), then top, bottom, front and finally end panels. After it was well cured, I layed down a small bead of glue along all the joints to ensure a good seal.
I haven't yet added the second layer top and front panels, as I'm still deciding how I want to finish the enclosure.
Once all the glue had dried, I knocked out a hole for a Neutrik Speakon 4 pole twist lock connector, and a small hole to run the the cable from one cabinet to the other. I used painters tape to mask the cut edges of the driver knockouts, and the length of the wiring, then went to down with three rattle cans of rustoleum spray in bed liner. The picture (in the next post) is after the first coat was applied. Getting an even coat took a lot of work, and a flashlight (because everything looks black inside there without a camera flash). 36 hours of cure time later, I was ready to mount the drivers and do a test run. I opted to use t-nuts and machine screws (M6 Allen head bolts to be exact) to mount the drivers, but the screw's shoulders were too long.. whoops. Mangled up some collars to let me mount the drivers in (goofily) to do a test run. First run, no leaks (I'd hope not after all that glue and spray in). Until I pick up a wall mount for my tv, the enclosure will be standing on end.