Hello-
I'm posting my build thread of the Murphy/Kittinger ER18MTM speaker. This is my first build thread so be kind guys. As far as I can tell there's at least 3 ER18 builds & one other potential one on this forum, interesting they're all happening at roughly the same time.
I purchased my materials from Meniscus a couple of months ago, I'm building the RS28F dome version, thought I was all set on the ribbon tweeter but my contact at Meniscus seemed to favor the RS28F so that's what I got. Either way it'll be OK, in the original ER18 thread, Richard Swerdlow said there wasn't a significant difference between the two tweeters. By the way, this will be the 5th or 6th speaker I've built, so, not a rank beginner, but not a pro either. This is most certainly the largest speaker I've built, all the others have been bookshelf size.
My son's roommate is a woodworker, rents space in a shop in town, he did the cutting for a small fee, also did initial glue up of the top, side, and shelf braces. That part wasn't my original plan, I just wanted the cutting done, but he seemed to want to do it, so fine. It may have worked better if I had done the gluing, I don't know. He assembled everything all at once, multiple pieces, multiple clamps, many things to get aligned, and in the end, somethings were a little out of alignment. I would have glued one shelf brace at a time, I have neither enough clamps, skill or experience to attempt what he did.
,
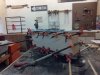
Here's a picture of the clamping setup at the shop, I think I count fourteen or fifteen clamps

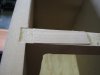
Some of the shelf braces were not lined up flush with the edges of the side pieces, hard to explain, but here's a pic: I could have left it alone I suppose, but then the back piece/front baffle would not have had full contact with the bracing piece. As you can see, I just cut a 3/4" piece of leftover veneer to fill the gap, not perfect, but it allowed solid contact all the way across the brace. Think I had four of the braces I had fix this way. The braces actually sloped from one side to the other so I had to use a block plane the slope the fill pieces.
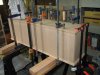
So, I've got the backs glued on both speakers, here's my clamping assembly. Quite the odd collection of clamps, I know, I was surprised I had that many, only had to borrow two (not including the sand bag
) I over-sized the back by 1/8 of an inch all the way around, then flush trimmed with a router
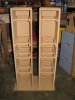
And, here's the assembled speakers to date--, next step is to rout the holes for the vents , layout & rout holes for speakers on the front piece. If I get that much done this weekend, I'll be doing great ! Fun project, it's fun just to build something, even if it isn't perfect every step of the way. Thanks for looking. I will be asking for advice in the future posts
Dave