ER18 MTM first time build

L

louis2001

Audiophyte
I have learned a lot from various forums when undertaking new projects, so I feel I should finally contribute. I am a first time speaker builder and after several weeks of researching, have started my build. It is so helpful seeing all the great threads regarding this speaker on this websiste. I don't really have any woodworking experience and previously only owned a circular saw. In preparation for this project, I did buy several new tools including: router, bits, clamps, straight edge, and a used biscuit cutter.

I am going to document my build and since there were a couple steps I wasn't too clear about, I will post my techniques so that it might help others with the same level of experience.

1) How to cut the openings in the braces.

2) How to attach the braces when gluing up the sides. Dado or not to dado. Or in my case....use biscuits.

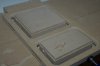
For the braces, the following is a final picture of how they look.

20130120-IMGP246.jpg

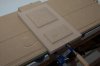
I decided to make the thickness 3/4" around the perimeter and 1" thick for the cross member. This gave me the opening size which I then used to calculate a template size for the cut outs. The following shows the templates secured to my brace, ready to be cut.

20130120-IMGP245.jpg

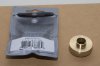
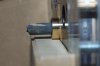
I used a guide bit on my router to trace the template. The guide bit I purchased has a 5/8" outer diameter and an opening of 17/32". The guide bit is shown below.

20130120-IMGP245.jpg

When attached to the router, you can see how the guide bit abuts a random piece of wood. Please note how the guide bit projects from the router base and can limit the thickness of material to be cut. I used a 3/8" cutting bit which was 1" long, so that it would be able to cut through the 3/4" mdf below the 1/4" template.

20130120-IMGP246.jpg

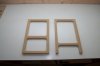
Also, note how the opening will be larger than the template I follow the router. The edge of the cutting bit is 1/2" beyond the template (half the guide diameter of 5/8" plus half the cutting bit diameter of 3/8". Therefore, I end up with width and length dimensions of the opening which are each 1" larger than the template. The pieces will look like this below......however, this photo was taken after I routed a roundover along the sharp edges.

20130120-IMGP246.jpg
 
L

louis2001

Audiophyte
In order to cut these pieces, I had to secure the brace by clamping it to a scrap piece of mdf, shown in one of my earlier pictures. The scrap piece of mdf has a fence glued to the far side in order to support the brace. This is elevated off my workbench by using four "bench cookies" from Rockle. These are somewhat sticky and will hold wood pieces relatively firmly just by pressure. This allowed space for the clamp below the worksurface keeping it out of the way of my router.

20130120-IMGP244.jpg


20130120-IMGP244.jpg

Once these were cut, I had to decide on how to secure them to the sides of the cabinet. I have never made a dado cut before, and learned about using biscuits for making joints. Luckily, I found a cheap biscuit cutter on craigslist. It took me a little while to figure out how to use it, but once I did, making the cuts was easy.

I used a straight edge to mark the top of all of the braces on the sides of the cabinets. The pencil marks the top of the brace.

20130120-IMGP243.jpg

This picture demonstrates the shelf in position on one side piece.

20130120-IMGP243.jpg

I then laid the piece down with the bottom of the brace facing up, and I clamped it tight. I marked two locations for the biscuit cuts on the brace and the side piece....shown below.

20130120-IMGP243.jpg
 
L

louis2001

Audiophyte
I then used this first brace to transfer these marks to each brace location on that side piece. Then, I secured each brace to its location and transfered the marks to it....shown below.


Once secured, I used my biscuit cutter to make the cuts in the side pieces....


and in the braces......you can see a biscuit positioned in the near slot....


These cuts are measured from the top of the brace....This is helpful, because it makes the top brace perfectly flush with the sides.

Once all the biscuit slots are cut, they look like this....


Now, you don't really have to use this method to make the exact same cuts in each brace. However, since the biscuit cuts are all identical, it doesn't matter if you accidentally position a regular brace behind the woofer when you made the cuts. They are interchangeable. (This was my mistake for the first box. I had to fill in the slots with wood glue and saw dust, and then recut them.)

The biscuits make it easy to position the braces when gluing them to the sides..There is a perfect amount of play in the joint so that you can get the edges nice and flush. Here is a pic of my boxes so far....I can hardly wait for the electrical kit from Meniscus audio!

 
ARES24

ARES24

Full Audioholic
Looks good!

I haven't heard a single bad comment on these speakers, I am sure you will love them. (Not as much as I love mine!!!!:p)
 
TheWarrior

TheWarrior

Audioholic Ninja
Beautiful craftsmanship! I envy you having the time to build. Personally, I hope to build a pair of speakers by the end of the year, but I am buried under home remodeling projects. So I am using the speakers as a 'carrot' to get me through and then build myself a beautiful pair of Christmas presents!
 
newsletter

  • RBHsound.com
  • BlueJeansCable.com
  • SVS Sound Subwoofers
  • Experience the Martin Logan Montis
Top